
이 글은 Notion을 통해 작성된 글로 원본은 링크에서 확인할 수 있습니다.
Redux란
Redux는 Javascript App을 위한 State Container이다. Redux는 일관성있고 예측 가능하게 동작하고 클라이언트나 서버에서 실행되며 테스트하기 쉬운 애플리케이션을 작성할 수 있게 도와준다. 그리고 중앙집중화로 취소와 재실행, 상태 지속 등과 같은 기능을 사용할 수 있다. 예를 들어 내 정보를 State에 한 번 저장하면 메인 페이지에서 사용할 수 있고 마이 페이지에서도 사용할 수 있게 해준다. 또한 디버깅이 가능해서 언제, 어디서, 왜 그리고 어떻게 State가 변경되었는지 추적할 수 있다. 주로 React와 함께 사용한다.
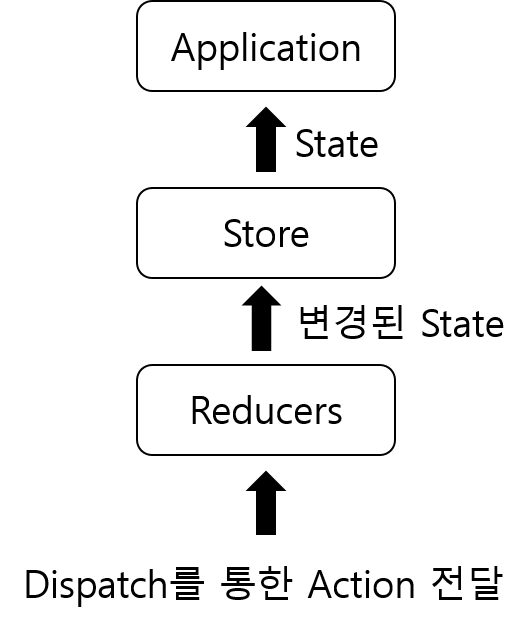
- State: 애플리케이션에서 사용할 데이터를 담아두는 곳이다.
reducer를 통해 값이 변경되고store에서 가져온다.
- Store:
state를 가지고 있는 곳이다.reducer를 통해 변경된state를 받고 저장하는 곳이다.
- Reducer:
state를 변경하는 곳이다.dispatch를 통해action을 전달받고 그에 따른 작업을 수행한다.store에 있는 이전의state를 받을 수 있다.
설치
다음과 같은 명령어로 Redux를 프로젝트에 설치할 수 있다.
# npm
	npm i redux

	# yarn
yarn add reduxRedux는 배포용에서도 동작해야 하기 때문에 --save-dev 플래그를 사용하지 않는다.
예제
import { createStore } from "redux"

	// Reducer
	function counterReducer(state = { value = 0 }, action) {
		switch (action.type) {
		case 'counter/incremented':
		  return { value: state.value + 1 }
		case 'counter/decremented':
		  return { value: state.value - 1 }
		default:
		  return state
	  }
	}

	// Store
	let store = createStore(counterReducer)

	// Subscribe
	store.subscribe(() => console.log(store.getState())

	// Dispatch
	store.dispatch({ type: "counter/incremented" })
	// { value: 1 }
	store.dispatch({ type: "counter/incremented" })
	// { value: 2 }
	store.dispatch({ type: "counter/decremented" })
	// { value: 1 }
먼저, counterReducer를 보면 state와 action을 매개변수로 받는다. 처음 실행하면 state에는 아무 값도 없기 때문에 초기값을 설정해준다. state는 store에 저장되어 있는 이전 state이고 action은 dispatch를 통해 받은 action이다. 그리고 action에 type을 통해 어떤 작업을 수행할지 정한다. 위의 예제 같은 경우 type이 counter/incremented라면 state.value 값이 1 증가하게 된다. 그리고 이렇게 만들어진 reducer를 가지고 store를 만든다. reducer에서 반환한 state는 store가 가지게 된다.
subcribe는 구독이라는 의미로 해당 store에서 state의 값이 변경되었을 때 실행되는 함수이다. 위의 예제에서 dispatch를 통해 action을 전달받은 reducer가 state를 변경시켰다면 state가 콘솔에 찍히게 된다.
또한 Toolkit을 통해 Redux를 만들 수 있다. Toolkit을 사용하면 코드가 좀더 직관적이고 보기 편하게 된다.
import { createSlice, configureStore } from "@reduxjs/toolkit"

	// Reducer
	const counterSlice = createSlice({
		name: "counter",
		initialState: {
			value: 0
		},
		reducers: {
			incremented: state => {
				state.value += 1
			},
			decremented: state => {
				state.value -= 1
			}
		}
	})

	export const { incremented, decremented } = counterSlice.actions

	// Store
	const store = configureStore({
		reducer: counterSlice.reducer
	})

	// Subscribe
	store.subscribe(() => console.log(store.getState())

	// Dispatch
	store.dispatch(incremented())
	// { value: 1 }
	store.dispatch(incremented())
	// { value: 2 }
	store.dispatch(decremented())
	// { value: 1 }
React와 함께 사용하기
먼저 폴더를 생성하고 다음 명령어를 통해 package.json을 만들어준다.
# npm
	npm init -y

	# yarn
	yarn init -y
그리고 CRA를 통해 React를 생성하고 사용할 패키지들을 설치한다.
# npm
	npx create-react-app my-app
	npm i redux react-redux

	# yarn
	yarn create react-app my-app
	yarn add redux react-redux
CRA를 하고 필요없는 파일은 정리와 코드 수정을 해줍니다.
├── node_modules
	├── public
			└── index.html
	├── src
			├── App.js
			└── index.js
	├── package.json
	└── yarn.lock
// src/index.js
import React from 'react';
import ReactDOM from 'react-dom';
import App from './App';
ReactDOM.render(
<React.StrictMode>
<App />
</React.StrictMode>,
document.getElementById('root')
);// src/App.js
import React from "react";
function App() {
return (
<div className="App">
</div>
);
}
export default App;<!-- public/index.html -->
<!DOCTYPE html>
<html lang="en">
<head>
<meta charset="utf-8" />
<meta name="viewport" content="width=device-width, initial-scale=1" />
<meta name="theme-color" content="#000000" />
<meta name="description" content="Web site created using create-react-app">
<title>React App</title>
</head>
<body>
<noscript>You need to enable JavaScript to run this app.</noscript>
<div id="root"></div>
</body>
</html>정리가 다 되었다면 다음과 같이 폴더를 만들어 줍니다.
src
	├── modules
			└── counter
					├── action
							├── types.js
							└── index.js
					└── index.js
			└── index.js
	├── App.js
	└── index.js
그리고 action/types.js에 reducer에서 사용할 type을 정해줍니다.
// modules/counter/action/types.js

	export const INCREMENTED = "counter/incremented"
export const DECREMENTED = "counter/decremented"action/index.js에는 action 함수와 action의 타입을 만듭니다.
// modules/counter/action/index.js

	import { DECREMENTED, INCREMENTED } from "./types"

	export const incremented = () => ({
		type: INCREMENTED
	})

	export const decremented = () => ({
		type: DECREMENTED
	})
그런 다음, counter/index.js에 reducer 함수를 만들어 줍니다.
// modules/counter/index.js

	import { INCREMENTED, DECREMENTED } from "./action/types";

	function counter(state = { value: 0 }, action) {
		switch(action.type) {
			case INCREMENTED:
				return {
					...state,
					value: state.value+1
				}
			case DECREMENTED:
				return {
					...state,
					value: state.value-1
				}
			default:
				return state
		}
	}

	export default counter
이번에는 reducer들을 하나로 합친 store를 만들어 프로젝트에 뿌려줍니다.
// modules/index.js

	import { combineReducers } from "redux"
	import counter from "./counter"

	const RootReducer = combineReducers({ counter })

	export default RootReducer
// index.js
import React from 'react';
import ReactDOM from 'react-dom';
import { createStore } from "redux"
import { Provider } from "react-redux";
import App from './App';
import rootReducer from './modules';
const store = createStore(rootReducer)
ReactDOM.render(
<React.StrictMode>
<Provider store={store}>
<App />
</Provider>
</React.StrictMode>,
document.getElementById('root')
);Custom Hook 만들기
react-redux 패키지의 connect와 mapStateToProps 등을 사용하여 store의 state와 reducer를 사용할 수 있지만 Custom Hook으로 만든다면 더 간편하게 사용할 수 있다.
다음과 같이 폴더와 파일을 생성한다.
src
	├── hooks
			└── useCounter.js
	├── modules
			└── counter
					├── action
							├── types.js
							└── index.js
					└── index.js
			└── index.js
	├── App.js
	└── index.js
그리고 useCounter.js에 사용할 state와 함수를 만들어 준다.
// hooks/useCounter.js

	import { useCallback } from "react";
	import { useSelector, useDispatch } from "react-redux";
	import { incremented, decremented } from "../modules/counter/action";

	export default function useCounter() {
		const counterState = useSelector(state => state.counter)
		const dispatch = useDispatch()

		const increase = useCallback(() => dispatch(incremented()), [dispatch])
		const decrease = useCallback(() => dispatch(decremented()), [dispatch])

		return { counterState, increase, decrease }
}useCallback과 useSelector, useDispatch를 사용하여 최적화를 해주었다. 한 개의 reducer만 존재하면 리렌더링이 되도 상관없지만 여러 reducer가 존재할 때 reducer를 사용한 모든 컴포넌트가 리렌더링이 된다면 필요없는 렌더링이 될 것이다.
App.js를 다음과 같이 수정한다.
// App,js

	import React from "react";
	import useCounter from "./hooks/useCounter"

	function App() {
	  const { counterState, increase, decrease } = useCounter()
	  return (
		<div className="App">
		  <p>{counterState.value}</p>
		  <button onClick={increase}>+</button>
		  <button onClick={decrease}>-</button>
		</div>
	  );
	}

	export default App;
그리고 프로젝트를 실행하면 counter가 잘 실행될 것이다.
